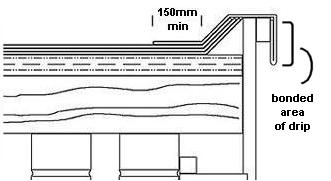
Roll it out along the edge keeping a three inch overhang.
Flat roof felt corners.
You will be placing the second layer of felt over this.
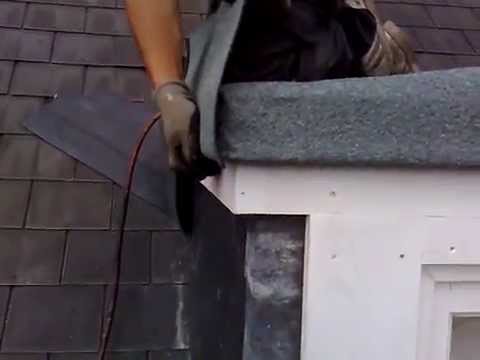
Run the base flashing 4 to 5 in.
Using galvanised clout nails nail down the first layer of felt.
Space each nail apart by about 30 to 36 inches 76 to 91 cm along the side of the felt closest to the roof s peak and 12 inch 30 5 cm along the side closest to the ground.
Let it stand for about 30 minutes and then using galvanized nails and your hammer nail down the first layer.
Apply a thin layer of roofing cement to the first layer of nylon fabric and glue it in place over the asphalt roofing.
After the roofing felt as been rolled along with the roof decking you can begin to secure it to the roof.
There are two good ways to handle corner flashing.
Ensure the felt remains even and straight as you work.
Bend the flap down and nail along the top edge.
This easy how to video shows flat roofers beginners and pros how to seal external corners.
In terms of spacing leave about 6 inches between nails along both of the short sides and the side lying next to the edge of the roof.
Begin laying out your roofing felt by starting at one corner.
If you re looking for premium quality industry standard cost effective edging our unique line of products will give your flat roof a smart professional look while preventing damp and condensation from infiltrating your roof.
Small sheds usually require about 100 to 150 clout nails.
Paint a thin layer of adhesive over the first felt layer.
Start at one of the upper corners of the felt and continue along the perimeter.
Lay the roll of roofing felt on the corner and let it overhang by three inches on each side.
Find out how to fix a kerb edge in this detailed instruction video.
It s best to start nailing in the center and work out from there.
No new flat roof installation is complete without the detail work.
Roll the felt so that it overhangs the edge by 2 inches.
Beyond the dormer and cut the top section along the dormer edge.
Step 3 secure felt to roof.
Complete the finish of a flat roof installation with permaroof kerb trim edging.